

Services
A service is an endpoint that is consistent (not ephemeral as containers) so that other applications or servers inside, or outside the cluster, might be able to access it. In other words, services are about taking your set of deployments (pods) and creating a persistent endpoint that can talk to them.
To expose your application as a network service, Kubernetes uses services as an abstract way to do that. Modifying your application to use an external service discovery is not needed when you are using Kubernetes, because Kubernetes gives Pods an IP address and a DNS name, load balancing traffic across them.
To list your services you use kubectl get services command. You can add either flag -w or --watch to automatically refresh your screen every 2 seconds so that you can check updates to your services.
Publishing Services
You’re probably going to need to expose your pods to external services at some point. That means allowing them to accept connections, in some fashion, in your cluster, or from outside your cluster.
One example to be publishing services would be if you are developing a website for a client or inside your company, and you need to publish that site on internet.
Use kubectl expose to create a service.
Kubernetes pods don’t automatically get a DNS name for external connectivity. You need to do that by creating a coreDNS service on top of that existing pod that will resolve your services by name.
The job of the following service types are to expose your applications inside or outside your cluster:
ClusterIP
The ClusterIP is the default service type and it always works inside the cluster. It doesn’t need anything special. It doesn’t need any firewall rules outside of the cluster for traffic to get to it. But, ClusterIP is only good in the cluster.
ClusterIP is really about one Kubernetes set of Pods talking to another set of Pods. ClusterIP is going to get an IP address in that virtual IP address space inside the cluster. That allows your other Pods running in the cluster to talk to this service using the port of the service.
If you’re running an Nginx app, and it was running on port 80 when you created the service, that service IP could also be on port 80 to keep some sort of consistency there. To do that you have to create this service with an expose command for example.
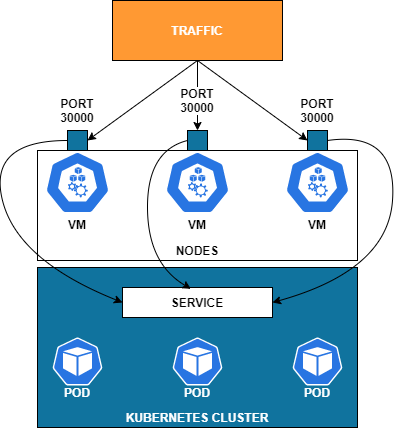
NodePort
A NodePort is designed for something outside the cluster to talk to your service through the IP addresses on the nodes themselves. When you create a NodePort, will give you high port (range 30000–32767) only customizable via YAML. NodePort will configure a high port on each node that’s assigned to this service. Once you get that, you can update other things that need to know about this port.
NodePort is going to be always a high port. You’re not going to use port 80, for example, when you use this type.
The key to both ClusterIP and NodePort is that they’re always available in any Kubernetes cluster. Whether you’re using a cloud vendors solution, or rolling your own Kubernetes, or deploying a packaged one like Docker Enterprise or Rancher.
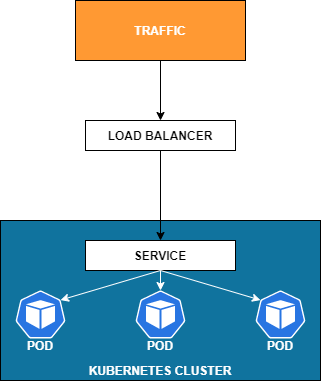
LoadBalancer
This is mostly used in the cloud. Essentially, this is a bunch of automation. What you’re doing here is in the background, when you create this load balancer, it’s going to automatically create the ClusterIP and the NodePort so that those are available.
Then it’s going to talk to the external system. Maybe it’s an AWS load balancer or some other cloud vendor. Basically, these are going to come from your infrastructure providers, and they will allow Kubernetes to talk to them through some remote API.
The two takeaways on this one are, to think about it only for traffic coming into your cluster from an external source and that it requires an infrastructure provider that gives Kubernetes the ability to talk to it remotely.
ExternalName
The last of the four service types you can use is ExternalName. This is used less often, and it doesn’t have anything to do with controlling inbound traffic to your services. This is more about applications/servers in your cluster needing to talk to outside services.
One of the reasons you might use ExternalName is when you’re doing migrations of things.
Think about if you have a remote application. That remote application outside of your Kubernetes cluster probably has a DNS name already assigned. If you’re going to be moving something from those external services to internal services, you might look at how you could use ExternalName as a substitute to control the DNS inside your Kubernetes workflow.
You basically then could have a single command line of Kubernetes rather than needing to change the external DNS for something and run some other utility for that DNS service. Or, possibly something that doesn’t even have an API behind it like an enterprise DNS.
You can use ExternalName inside your clusters so that services inside your clusters start resolving a different endpoint than the one that they previously had that was external.
Another case you could be using is when you need to change how your application or server is getting out of the cluster to some external service, but you don’t have a way of controlling the DNS remotely of those other things. So, you would rather just do it inside of Kubernetes and create some ExternalNames for your application. Then, when you want to change it dynamically in Kubernetes for your application inside your cluster, you can do that pretty easily without having to talk to anything else.
Conclusion
The job of these four different service types is to tell how it gets traffic to your service choosing IP, port and DNS names so you can be able to expose your services externally or internally from your cluster.
