
Microsoft Windows has a robust logging subsystem that captures a number of system events and activities by default. It also can be used to capture other types of useful data. Event sources are grouped into log providers with unique event IDs for each event.
Unlike Unix-based systems, which primarily create logs in the form of line-based text files, Windows events are stored in a binary log format identified by a .evt or .evtx file extension. This formatting makes it difficult to directly access the log files, but Windows addresses this problem by providing APIs and log viewer programs that make querying easy.
Querying Logs
There are three main ways for user to access event logs from a Windows session. They are the graphical Windows Event Viewer eventvwr.msc, the command line wevtutil.exe, and the PowerShell cmdlet Get-WinEvent. Each of these options enable users to query any of the log providers and event IDs, and each has various strengths and weaknesses.
Windows Event Viewer
The Windows Event Viewer is a graphical program that enables users to view and create complex queries against the various Windows event log providers. It allows for the creation and saving of custom views to facilitate easy analysis of repetitive tasks.
By default, the Windows Event Viewer opens as a three-pane Microsoft Management Console. In the left-hand panel, there is a tree of event log providers. In the middle is a view of selected providers’ events, and in the right-hand panel, there is an action pane.
The event viewer is best option for when a user needs to explore manually with logs and run complex queries. It enables users to build custom views that help them to quickly key in on event types for a particular task. This flexibility can be very helpful when users aren’t sure exactly what they are looking for.
Wevtutil
The wevtutil binary can be used to query or enumerate logs from a Windows command shell or batch script.
Some useful options for wevtutil include the following:
wevtutil el  # List the system log providers
wevtutil qe Security /c:5  # Show the last 5 results for the 'Security' provider
wevtutil qe Security /q:*/System/EventID=4624 /c:10 # show the last 10 security logon events
wevtutil qe Security /q:*/System/EventID=4648 /rd:true /f:text /c:1 # show the most recent local logon
Note: For users who are running test queries and displaying them on screen, it’s a good idea to use the /c option to limit the number of results returned.
Get-WinEvent CmdLet
The PowerShell cmdlet Get-WinEvent can be used to query the same log providers as wevtutil. The advantage is that it returns the results as a PowerShell object. That means users can manipulate and format is further using normal PowerShell constructs, such as Select and Select-String. It is best used as part of PowerShell scripts to check system status or watch for certain alerts.
As is the case with most PowerShell modules, users can see a display of the full range of capabilities using the Get-Help Get-WinEvent command.
The following are examples of Get-WinEvent queries that correspond to the wevtutil examples:
Get-WinEvent -ListProvider *  # List the system log providers
Get-WinEvent -LogName Security -MaxEvents 5  # Show the last 5 results for the *Security* provider
Get-WinEvent -LogName Security -FilterXPath '*/System/EventID=4624'
Get-WinEvent -LogName Security -FilterXPath '*/System/EventID=4648' -Oldest -MaxEvents 1
Similar to wevtutil, if you are running basic or exploratory queries on the PowerShell command line, it is a good idea to generally use the -MaxEvents option. Doing so facilitates faster completion of the command while also not overloading the user’s screen.
Filtering Queries With XPath
All of the methods of querying Windows event logs support XPath queries as event filters. XPath is defined by the W3C for structured data filtering. Microsoft has adapted a subset of its features for queries of structured event data. It is a very powerful tool with many available options, but can be daunting for users to learn and master it.
All valid XPath event queries need to start with either ‘*’ or ‘Event’ to select the event stream. Beyond that, they need to specify elements in the XML tree for the event or events the user wants to see. The easiest way to see this is with the Event Viewer XML view (illustrated below):
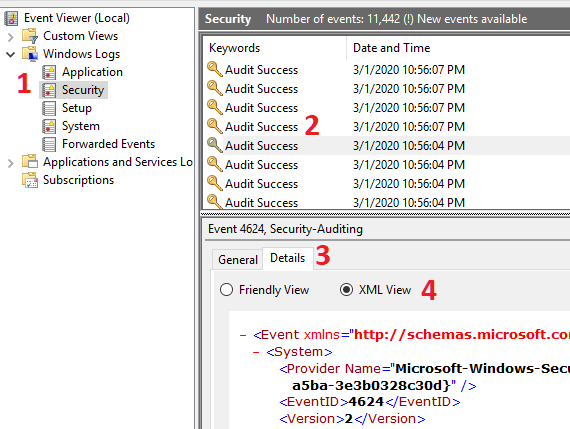
After a user launches Event Viewer, he or she then selects one of the log providers on the left (1). Next, her or she selects one of the events for which they want to see the schema (2). They then select the Details pane (3), and finally select the radio button for ‘XML View’ (4).
In the screenshot provided above, if the user wanted to select by EventID, he or she would need to use the following XPath expression to filter Events:
Events/System/EventID=4624
Since Events is the only possible root node for Windows event queries, this can be simplified with an asterisk wildcard. Also, since EventID only appears in one place within the Event schema, the following two queries are equivalent.
*/System/EventID=4624   # just Events wildcarded
*/*/EventID=4624        # both wildcarded
NOTE: Readability is impacted each time a user adds a wildcard. So, for scripts, it is a good practice to still list the full path.
For filtering based on elements under EventData, note that these are all stored as XML attributes and require a slightly different syntax to filter on. The following example shows how to find events containing the Data attribute called TargetUserName.
Event/EventData/Data[@Name="TargetUserName"]    # Filter on just events containing TargetUserName
Event/EventData/Data[@Name="TargetUserName"]="ContosoAdmin" # Filter on events where TargetUserName is a specific value
*/*/Data[@Name="TargetUserName"]="ContosoAdmin" # Equivalent filter using wildcards
Filtering of event time requires matching the SystemTime attribute of TimeCreated. It is millisecond-specific, so unless you know the exact time of the event in question, use greater-than/less-than operators to match a time range. The comparison timestamp only needs to be specific to seconds. Another method is to use the timediff function in Xpath to calculate an offset from the current SystemTime.
# Query on a specific timestamp (must go to milliseconds!)
Get-WinEvent -LogName System -FilterXPath '*/*/TimeCreated[@SystemTime="2020-03-08T16:24:27.042Z"]'
# Query events before a date
Get-WinEvent -LogName System -FilterXPath '*/System/TimeCreated[(@SystemTime<"2020-03-01T00:00:00Z")]'
# Query events in a given hour of a day
Get-WinEvent -LogName System -FilterXPath '*/System/TimeCreated[(@SystemTime>"2020-02-11T11:00:00Z") and (@SystemTime<"2020-02-11T12:00:00Z")]'
# Query events in the last 24 hours (86400000 ms)
Get-WinEvent -LogName System -FilterXPath '*/*/TimeCreated[timediff(@SystemTime) <= 86400000]'
Lastly, users can specify Boolean arguments as part of XPath to combine filters and find more specific events.
wevtutil qe Security '/q:Event/EventData/Data[@Name="TargetUserName"]="ContosoAdmin" and Event/System/EventID=4624' /f:text /c:1
Get-WinEvent -LogName Security -FilterXPath '*/System[EventID!=4624 and EventID!=4648]' -MaxEvents 1
Log File Size
By default, Windows systems only allocate 10-20 MB per log file. This is suitable for a general-purpose system, or for cases where central log forwarding has been configured but needs to be increased to enable additional custom logging on a local system. Fortunately, most modern systems have plenty of local storage, which allows users to significantly increase log sizes.
The easiest way to view or change log sizes is with wevtutil on the command line. It’s smart to use the sl option to set log parameters, and the /ms option to specify the new maximum size.
wevtutil gl "Security"                # Print the current parameters of the Security log provider
wevtutil sl "Security" /ms:100000000  # Set the security log maximum size to 100MB
PowerShell Logging
One of the most useful optional logging features of Windows is the ability to capture information about PowerShell commands and module operation. There are three main components to this: module logging, script block logging, and transcription logging.
PowerShell Module Logging
Module logging keeps track of which PowerShell modules are loaded and which variables have been initialized by scripts on the system. By default, it will only record the first time a module is loaded but can be configured to log each invocation of a module to tie them back to individual scripts and users. Module logging will create Windows Events with ID 4103 in the Microsoft-Windows-PowerShell/Operational event provider.
To enable PowerShell module Logging, create a ModuleLogging Key under the PowerShell policies hierarchy with the following contents:
New-Item -Path HKLM:\SOFTWARE\Policies\Microsoft\Windows\PowerShell\ModuleLogging -ForceNew-ItemProperty -Path HKLM:\SOFTWARE\Policies\Microsoft\Windows\PowerShell\ModuleLogging -Name EnableModuleLogging -PropertyType DWORD -Value 1New-Item -Path HKLM:\SOFTWARE\Policies\Microsoft\Windows\PowerShell\ModuleLogging\ModuleNamesNew-ItemProperty -Path HKLM:\SOFTWARE\Policies\Microsoft\Windows\PowerShell\ModuleLogging\ModuleNames -Name '*' -PropertyType String -Value '*'
PowerShell Script Block Logging
Script block logging records the actual blocks of code executed by the PowerShell engine. A key enhancement it offers over just module logging is the increased visibility it gives users into obfuscated or encoded commands (which are a TTP commonly used by malicious actors). Script block logging will create Windows Events with ID 4104 in the Microsoft-Windows-PowerShell/Operational event provider.
Similar to module logging, it is enabled by creating a registry key with certain values:
New-Item -Path HKLM:\SOFTWARE\Policies\Microsoft\Windows\PowerShell\ScriptBlockLoggingNew-ItemProperty -Path HKLM:\SOFTWARE\Policies\Microsoft\Windows\PowerShell\ScriptBlockLogging -Name ScriptBlockLogging -PropertyType DWORD -Value 1
Transcription
Starting with PowerShell Version 5, Windows includes the ability to record transcriptions of all executed commands. This capability significantly improves the blue team’s ability to observe malicious behavior. This needs to be enabled with a registry key and given a target directory to write to. In a production scenario, it is best to have these logs sent to another system to prevent an adversary from simply clearing the local logs.
NOTE: Transcription will only log interactive user sessions, not necessarily background scripts and processes using PowerShell.
Alternatively, transcription can be manually enabled and disabled using Start-Transcript and Stop-Transcript cmdlets or enabled for all user sessions using a profile.ps1 file in the $PsHome\Profile.ps1 directory.
To enable system-wide transcription, create a Transcription registry key configured to point at an output directory. Make sure that the selected directory exists and is writable!
New-Item HKLM:\SOFTWARE\Policies\Microsoft\Windows\Powershell\TranscriptionNew-ItemProperty -Path HKLM:\SOFTWARE\Policies\Microsoft\Windows\Powershell\Transcription -Name EnableTranscripting -PropertyType DWORD -Value 1New-ItemProperty -Path HKLM:\SOFTWARE\Policies\Microsoft\Windows\Powershell\Transcription -Name EnableInvocationHeader -PropertyType DWORD -Value 1New-ItemProperty -Path HKLM:\SOFTWARE\Policies\Microsoft\Windows\Powershell\Transcription -Name OutputDirectory -PropertyType String -Value C:\PSHTranscriptsNew-Item 'C:\PSHTranscripts' -ItemType "directory"
Conclusion
Having read the above material, users should now understand at a high level how Windows logs are organized, how to query and configure them, and some particular examples of configuring PowerShell logging. Using these capabilities, system administrators and cyber incident response teams can get great visibility into the operation of their systems.
