
 Photo by Michael Geiger on Unsplash
Have you ever wondered how malware is detected? How do malware scanners work? How does Gmail know that the suspicious attachment you got was “dangerous”?
After all, malware comes in all shapes and sizes, and there is no one characteristic that tells you whether a file can cause harm or not.
How is Malware Detected?
Malware detection is often done through the identification of certain features of known malicious files.
One way of detecting malware is to calculate a hash of the suspected file and compare it to the hashes of known malware.
Sometimes, antivirus software scans for a particular string in a file that identifies particular strains or entire families of malware. Antivirus software might also search for a sequence of bytes that are typical of a specific virus or trojan.
The tool that we are going to talk about today, YARA, takes this latter approach. Let’s dive into how YARA detects malware files, how you can install and use YARA, and how to author your own YARA rules for customized malware detection!
What is YARA?
YARA is a tool that identifies malware by creating descriptions that look for certain characteristics. Each description can be either a text or a binary pattern. These descriptions are called “rules”. And by using rules that specify regex patterns, YARA enables the detection of specific patterns in files that might indicate that the file is malicious.
By using hex patterns, plain text patterns, wild-cards, case-insensitive strings, and special operators, YARA rules can be incredibly diverse and effective at detecting a wide range of malware signatures.
Let’s take a look at the below example. (Example is taken from YARA’s official documentation here:https://yara.readthedocs.io/en/latest/)
rule silent_banker : banker
{
   meta:
       description = "This is just an example"
       threat_level = 3
       in_the_wild = true
   strings:
       $a = {6A 40 68 00 30 00 00 6A 14 8D 91}
       $b = {8D 4D B0 2B C1 83 C0 27 99 6A 4E 59 F7 F9}
       $c = "UVODFRYSIHLNWPEJXQZAKCBGMT"
   condition:
       $a or $b or $c
}
This above rule tells YARA that any file that contains one of the following strings:
6A 40 68 00 30 00 00 6A 14 8D 91
8D 4D B0 2B C1 83 C0 27 99 6A 4E 59 F7 F9
"UVODFRYSIHLNWPEJXQZAKCBGMT"
Should be flagged as the Silent Banker Trojan. Note that the first two strings are hex patterns and the third one is a text pattern.
(The Silent Banker Trojan is a Trojan virus that steals banking credentials from your computer. Read more about it here.)
Installing YARA
YARA is multiplatform and supports both Windows and Unix based systems. You can use it both as a command-line tool as well as a Python extension to use in your Python scripts.
For a complete guide for installing YARA on different platforms and installing the Python extension, please refer to the official documentation here. Let’s go through how to install YARA from the source tarball in this article.
First, download the dependencies that YARA needs. You’ll need automake, autoconf, libtool, make, gcc, and pkg-config.
sudo apt-get install automake libtool make gcc pkg-config autoconf libssl-dev libmagic-dev
Next, download the tarball for the latest version of YARA, and get it prepared for compilation:
tar -zxf v<version>.tar.gz
cd yara-<version>
./bootstrap.sh
Next, compile and install YARA:
./configure --with-crypto --enable-magic
make
sudo make install
Update shared libraries:
sudo ldconfig
At last, check that everything is installed correctly by running the test cases:
make check
Getting a Set of Rules to use
While you could write your own rules, there are plenty of well-defined YARA rules files available for download on Github.
For example, you can find a list of already-written YARA rules in the awesome-yara repository:
Besides analyzing malware, YARA can also be used to analyze the nature of files and classify file contents. The yara-forensics repository contains rules for determining file types by detecting magic bytes.
You can simply go to these repositories, find the rules that scan for the signatures that you are looking for and use that file as your YARA command input. You can download a rules file host on Github by using the command:
curl -o FILENAME LINK_TO_FILE
Where FILENAME is the local file name that the downloaded file is going to be saved as, and the LINK_TO_FILE is the address of the file online.
Downloading a specific rule file
For example, let’s say you want to use VirusTotal’s sample.rules.
Once you open the file on Github, you will see a window like this:
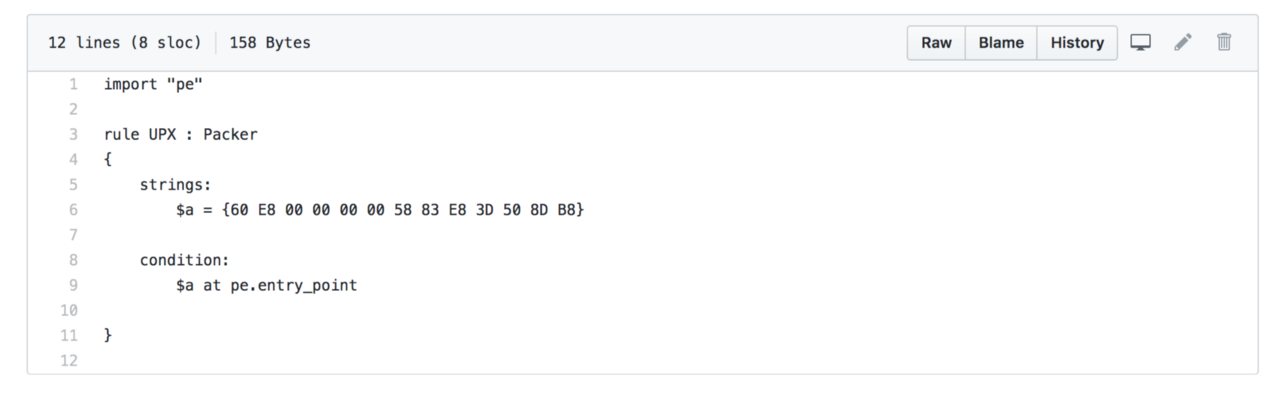
When you click on the “Raw” link on the top right, the link will take you to the URL where the sample.rules path is stored at. In this case, the URL is https://raw.githubusercontent.com/VirusTotal/yara/master/sample.rules.
Simply run the command below to download a copy to your computer:
curl -o Desktop/sample.yara https://raw.githubusercontent.com/VirusTotal/yara/master/sample.rules
Now, you have a copy of the rules stored in the sample.yara file on your desktop!
Running YARA
To run YARA from the command line, run the command:
yara [OPTIONS] RULES_FILE TARGET
The RULES_FILE points to a file that stores the YARA rules that you want to use, while TARGET points to a file, a folder or a process to be scanned.
For example, let’s analyze if a random file is a PDF using YARA!
We would first need to download the rules file that identifies a PDF from the yara_forensics repository:
curl -o Desktop/pdf.yara https://raw.githubusercontent.com/Xumeiquer/yara-forensics/master/file/pdf.yar
We can then run the YARA rules against the file we want to analyze:
yara Desktop/pdf.yara TARGET_FILE_TO_ANALYZE
Good Luck!
There are many more ways of detecting malware, but YARA is a powerful way to detect and classify many different kinds of malicious files. Good luck with your journey of using YARA!
