Application programming interfaces (APIs) - the connecting links between services, applications and data, have become essential for enterprise developers as they allow programmers to easily integrate and reuse different external software components instead of having to develop those components themselves.
With the growing popularity of APIs the potential for security related issues also increases. Nowadays, compromised or exposed APIs are one of the main reasons behind major data breaches. That said, it is vital to keep them secure and protected, especially when it comes to transferring sensitive or personal data like medical or financial records, credit card information, etc.
How should you approach building and managing a secure API without sacrificing functionality or agility? Here are some tips and best practices for strengthening your API security:
TLS Encryption
It is important to encrypt the data that is being sent via APIs. This can be done by using Transport Layer Security (TLS). TLS is a cryptographic protocol that secures the communication between two systems (client - server or server - server) by:
- Providing confidentiality through data encryption.
- Using public-key cryptography to authenticate the communicating parties.
- The keys for this encryption are unique for each connection. They are established at the beginning of the session and are derived during a process called TLS handshake.
- Checking the integrity of every message to prevent data loss or alteration during the transfer.
Authentication and Authorization
API access control is the foundation of effective API security. The system should authenticate both end users and applications. Here are 3 most common methods of API authentication:
- HTTP Basic authentication
- API Keys
- OAuth
Allthough there are some use cases for HTTP Basic and API Keys, it is best to go with the OAuth method as it is scalable, fast and easy to set up.
When it comes to authorization, you should use the following:
Protect HTTP Methods
The most common HTTP Methods used by APIs are: GET request (used to read an entity), POST request (used to insert/create an entity), PUT request (used to replace/update an entity) and DELETE request (used to delete a record).
Because APIs usually allow multiple methods for a given URL endpoint, it is a common practice for hackers and pentesters to try different request methods for known endpoints. For example when you know that a GET method is used by an application to retrieve all users via the /users endpoint, you can try to send a POST request to the same /users endpoint to add a user.
It is important to whitelist allowable methods and to verify that the incoming method is valid for the requesting user. This applies especially for the methods that can be used to modify/delete data (POST, PUT, DELETE, etc).
Sensitive information in HTTP requests
RESTful web services should be careful to prevent leaking credentials. Passwords, security tokens, and API keys should not appear in the URL, as this can be captured in web server logs, which makes them intrinsically valuable.
OK:
https://example.com/resourceCollection/[ID]/action
https://twitter.com/vanderaj/lists
NOT OK:
https://example.com/controller/123/action?apiKey=a53f435643de32
(Because the API Key is exposed in the URL.)
In POST/PUT requests, sensitive data should be transferred in the request body or request headers. In GET requests, sensitive data should be transferred in an HTTP Header.
Rate Limiting
A large number of API calls made by the same user for a single resource can indicate to a programming mistake like calling the API in an endless loop or worse, to a malicious user executing a Brute-Force or Denial-of-service attack.
To avoid such abusive behaviour, you should use quotas (login attempts, requests per time unit, bandwidth limits, etc) and throttling to limit the possible number of API calls made for an API resource.
Input Validation
Input validation can be beneficial in many ways:
- Getting the right data, in the right format - this guarantees the proper functionality of the application.
- Protecting the users - for example, forcing the users to use a secure password helps to keep their account and data safe from password cracking attempts.
-
Protecting your system - it is recommended to never trust the data received from the user. Attackers can tamper with different parts of the HTTP request: the URL, query string, headers, cookies and form fields to bypass the security.
In addition to the URL, all XML-based input has to be validated by using secure XML parsing.
Output Encoding
Let’s assume that the input validation fails for some reason and a malicious payload gets accidentally passed into the application anyway. You should still be fine as long as you have output encoding implemented in your system. This means that if, for example a user succeeds to input a script into the API, it would be rendered as plain text, not as a script when it’s output by the application.
Security Headers
There are some headers that the API should send on output to make sure the content of a given resource is correctly interpreted by the browser:
- Content-Type - it should preferably include a charset in addition to the correct content type.
- X-Content-Type-Options: nosniff - helps to make sure that the browser does not try to detect a different Content-Type than included.
- X-Frame-Options: deny - to avoid drag-and-drop clickjacking attacks in older browsers.
JSON and XML Encoding
It is vital to use proper JSON or XML serializers to encode data. This ensures you that the output content is parsable and prevents execution of arbitrary user-supplied input.
Error handling
Correct error handling is important in every application. Keep your error responses generic. While details in the error message can help you debug your application, they can also give useful hints to the attacker.
Let’s say you have a login form for authenticating a user and the user provides a correct username with the wrong password. They get the following response:
Status Code: 401, Reason: WRONG_PASSWORD
This will inform an attacker that the entered username is correct and allow him to switch his attention to cracking the password. A more suitable response would be:
Status Code: 401, Reason: INVALID_LOGIN_INFORMATION
HTTP Status Codes
When designing an API, you should always use appropriate status codes for the responses, not just 200 for success and 404 for error.
Here is a list of security related status codes that will help you with choosing the right one:
| Code | Message | Description |
|---|---|---|
| 200 | OK | Response to a successful REST API action. The HTTP method can be GET, POST, PUT, PATCH or DELETE. |
| 201 | Created | The request has been fulfilled and resource created. A URI for the created resource is returned in the Location header. |
| 202 | Accepted | The request has been accepted for processing, but processing is not yet complete. |
| 301 | Moved Permanently | Permanent redirection. |
| 304 | Not Modified | Caching related response that returned when the client has the same copy of the resource as the server. |
| 307 | Temporary Redirect | Temporary redirection of resource. |
| 400 | Bad Request | The request is malformed. For example, there’s an error in the format of the message body. |
| 401 | Unauthorized | Wrong or no authentication ID/password provided. |
| 403 | Forbidden | It’s used when the authentication succeeded but the authenticated user doesn’t have permission to the requested resource. |
| 404 | Not Found | When a non-existent resource is requested. |
| 405 | Method Not Acceptable | The error for an unexpected HTTP method. For example, the REST API is expecting HTTP GET, but HTTP PUT is used. |
| 406 | Unacceptable | The client presented a content type in the Accept header which is not supported by the server API. |
| 413 | Payload too large | Use it to signal that the request size exceeded the given limit; e.g. regarding file uploads. |
| 415 | Unsupported Media Type | The requested content type is not supported by the REST service. |
| 429 | Too Many Requests | The error is used when there may be a DoS attack detected or the request is rejected due to rate limiting. |
| 500 | Internal Server Error | An unexpected condition prevented the server from fulfilling the request. Be aware that the response should not reveal internal information that helps an attacker, e.g. detailed error messages or stack traces. |
| 501 | Not Implemented | The REST service does not implement the requested operation yet. |
| 503 | Service Unavailable | The REST service is temporarily unable to process the request. Used to inform the client that it should retry at a later time. |
API testing tools
DevTools Network panel
The browser’s developer tools network panel can be used to make sure that the resources are actually being downloaded or uploaded by the application or to inspect the contents and properties of an individual resource.
There are several ways you can open up the Google Chrome DevTools Network panel:
- With a shortcut - Press F12/Ctrl+Shift+I for Windows/Linux or Command+Option+I for Mac > Click on the Network tab
- From Chrome’s main menu - Click Customize and control Google Chrome (
 ) > Select More Tools > Developer Tools > Click on the Network tab
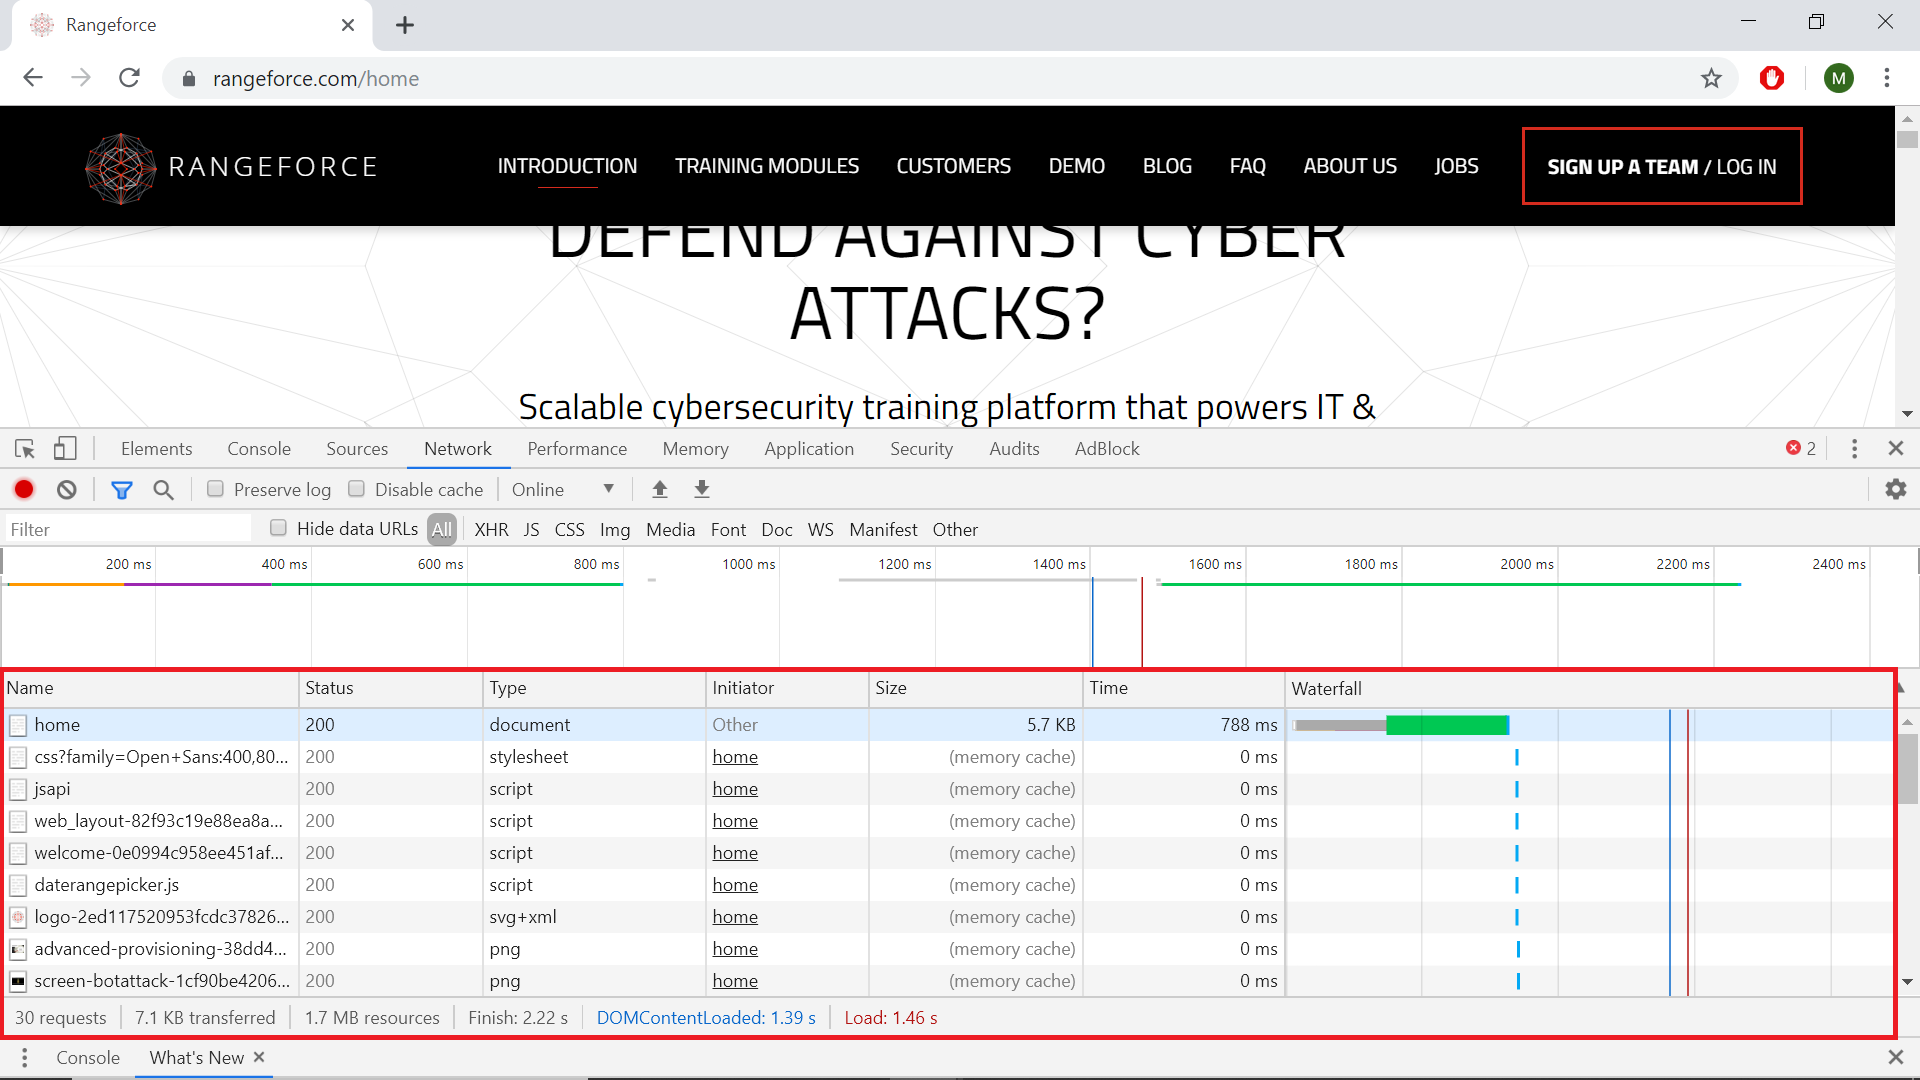
The Network panel consists of different parts but the most important one is the Network Log, which logs all network activity. Reload the page if no activity is shown.

Each row in the Network Log represents a resource. They are in chronological order. Each column represents some piece of information about a resource. The information columns that are displayed by default are:
- Name - The name of the resource.
- Status - The HTTP response code.
- Type - The resource type.
-
Initiator - The object or process that initiated the request. It can have one of the following values:
- Parser. Chrome’s HTML parser initiated the request.
- Redirect. An HTTP redirect initiated the request.
- Script. A script initiated the request.
- Other. Some other process or action initiated the request, such as the user navigating to a page via a link, or by entering a URL in the address bar.
- Size - The combined size of the response headers plus the response body, as delivered by the server.
- Time - The total duration, from the start of the request to the final byte received in the response.
- Waterfall - The Timeline column displays a visual waterfall of all network requests. Clicking the header of this column reveals a menu of additional sorting fields.
You can add additional columns for more information or hide the ones you are not using by right clicking on the header of the Network Log table.
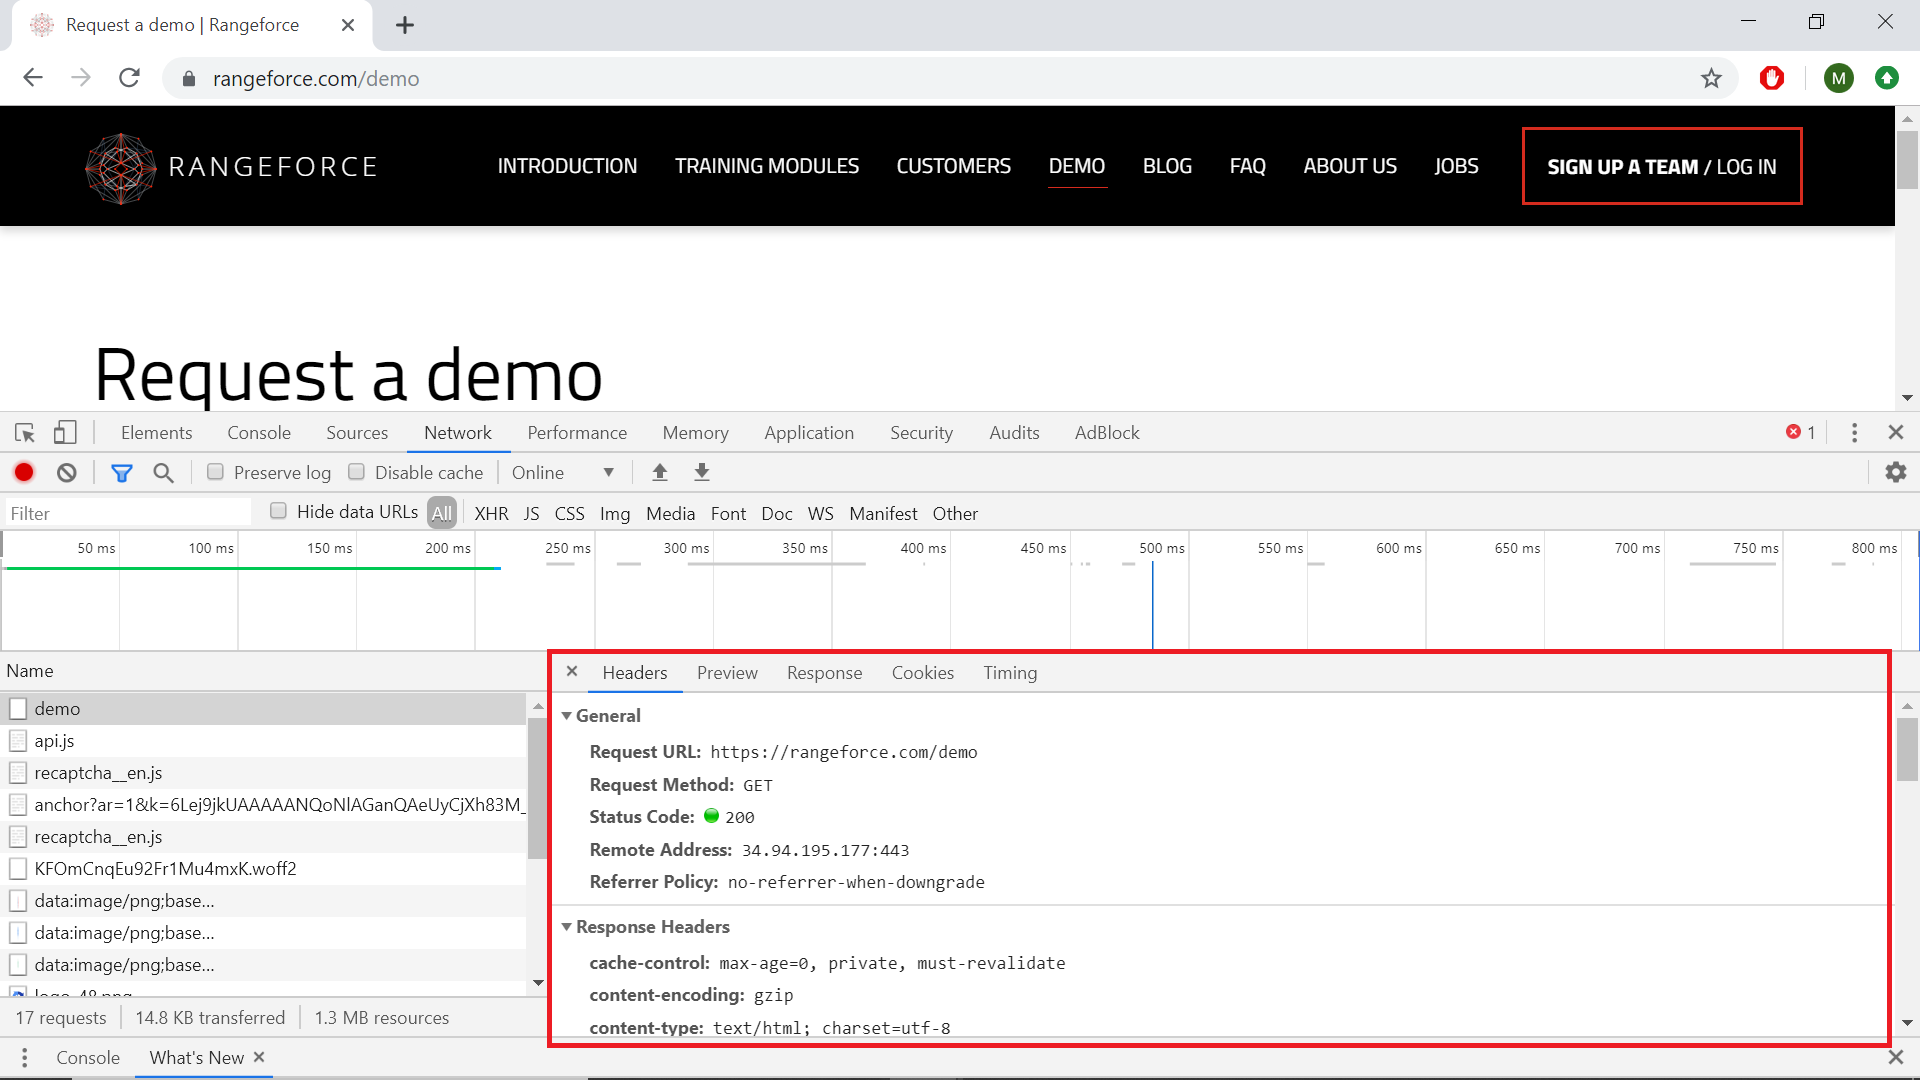
To get more information for a single resource click on the name of the resource.

This will open up a new pane that contains details about:
- Headers - General information about the request, request headers and response headers.
- Response - The response data for the request.
- Timing - A detailed breakdown of the request lifecycle for the resource.
- Cookies - A table of cookies transmitted in the resource’s HTTP request and response headers. This tab is only available when cookies are transmitted.
- Frames - WebSocket connection information. This tab is only visible when the selected resource initiated a WebSocket connection.
There is also a Preview tab, which may contain useful information, depending on the type of the resource. It gives a more structured overview of the response data. It is mostly used for viewing images.
Postman
Postman is currently one of the most used tools for API testing, mostly because it is an open source tool and it is easy to use.
Here are some basic features of Postman:
GET Request
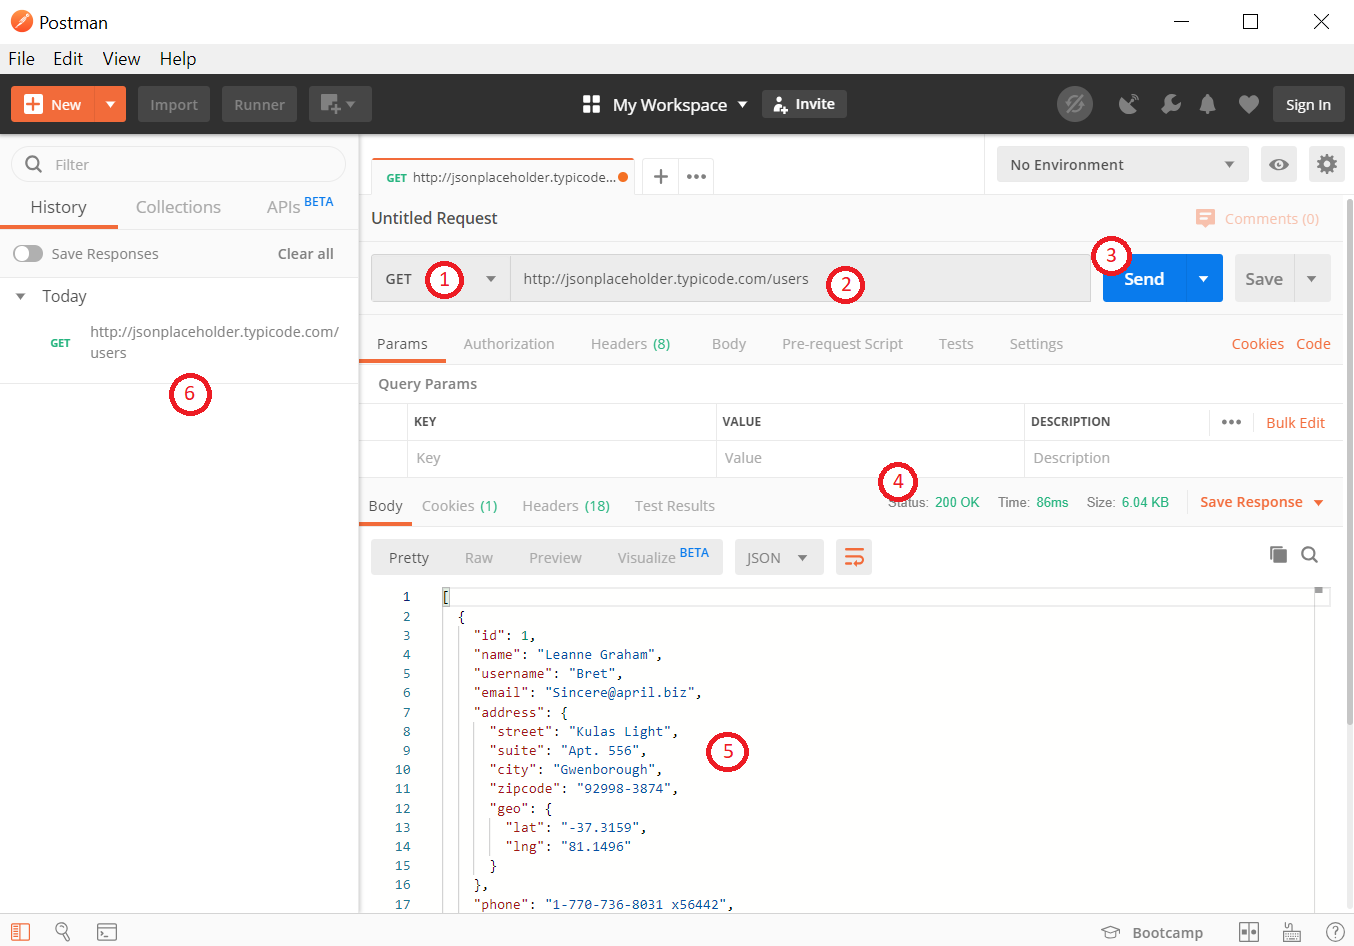
Let’s begin with sending a GET request with Postman. You can do that by following these simple steps:
- Set the HTTP request method to GET.
- Enter the request URL.
- We will use
https://jsonplaceholder.typicode.com/usersfor the example.
- We will use
- Click Send.
- You will see a
200 OKstatus code. - There should be 10 users in the response body.
- The sent request will be saved to the history pane.

PUT Request
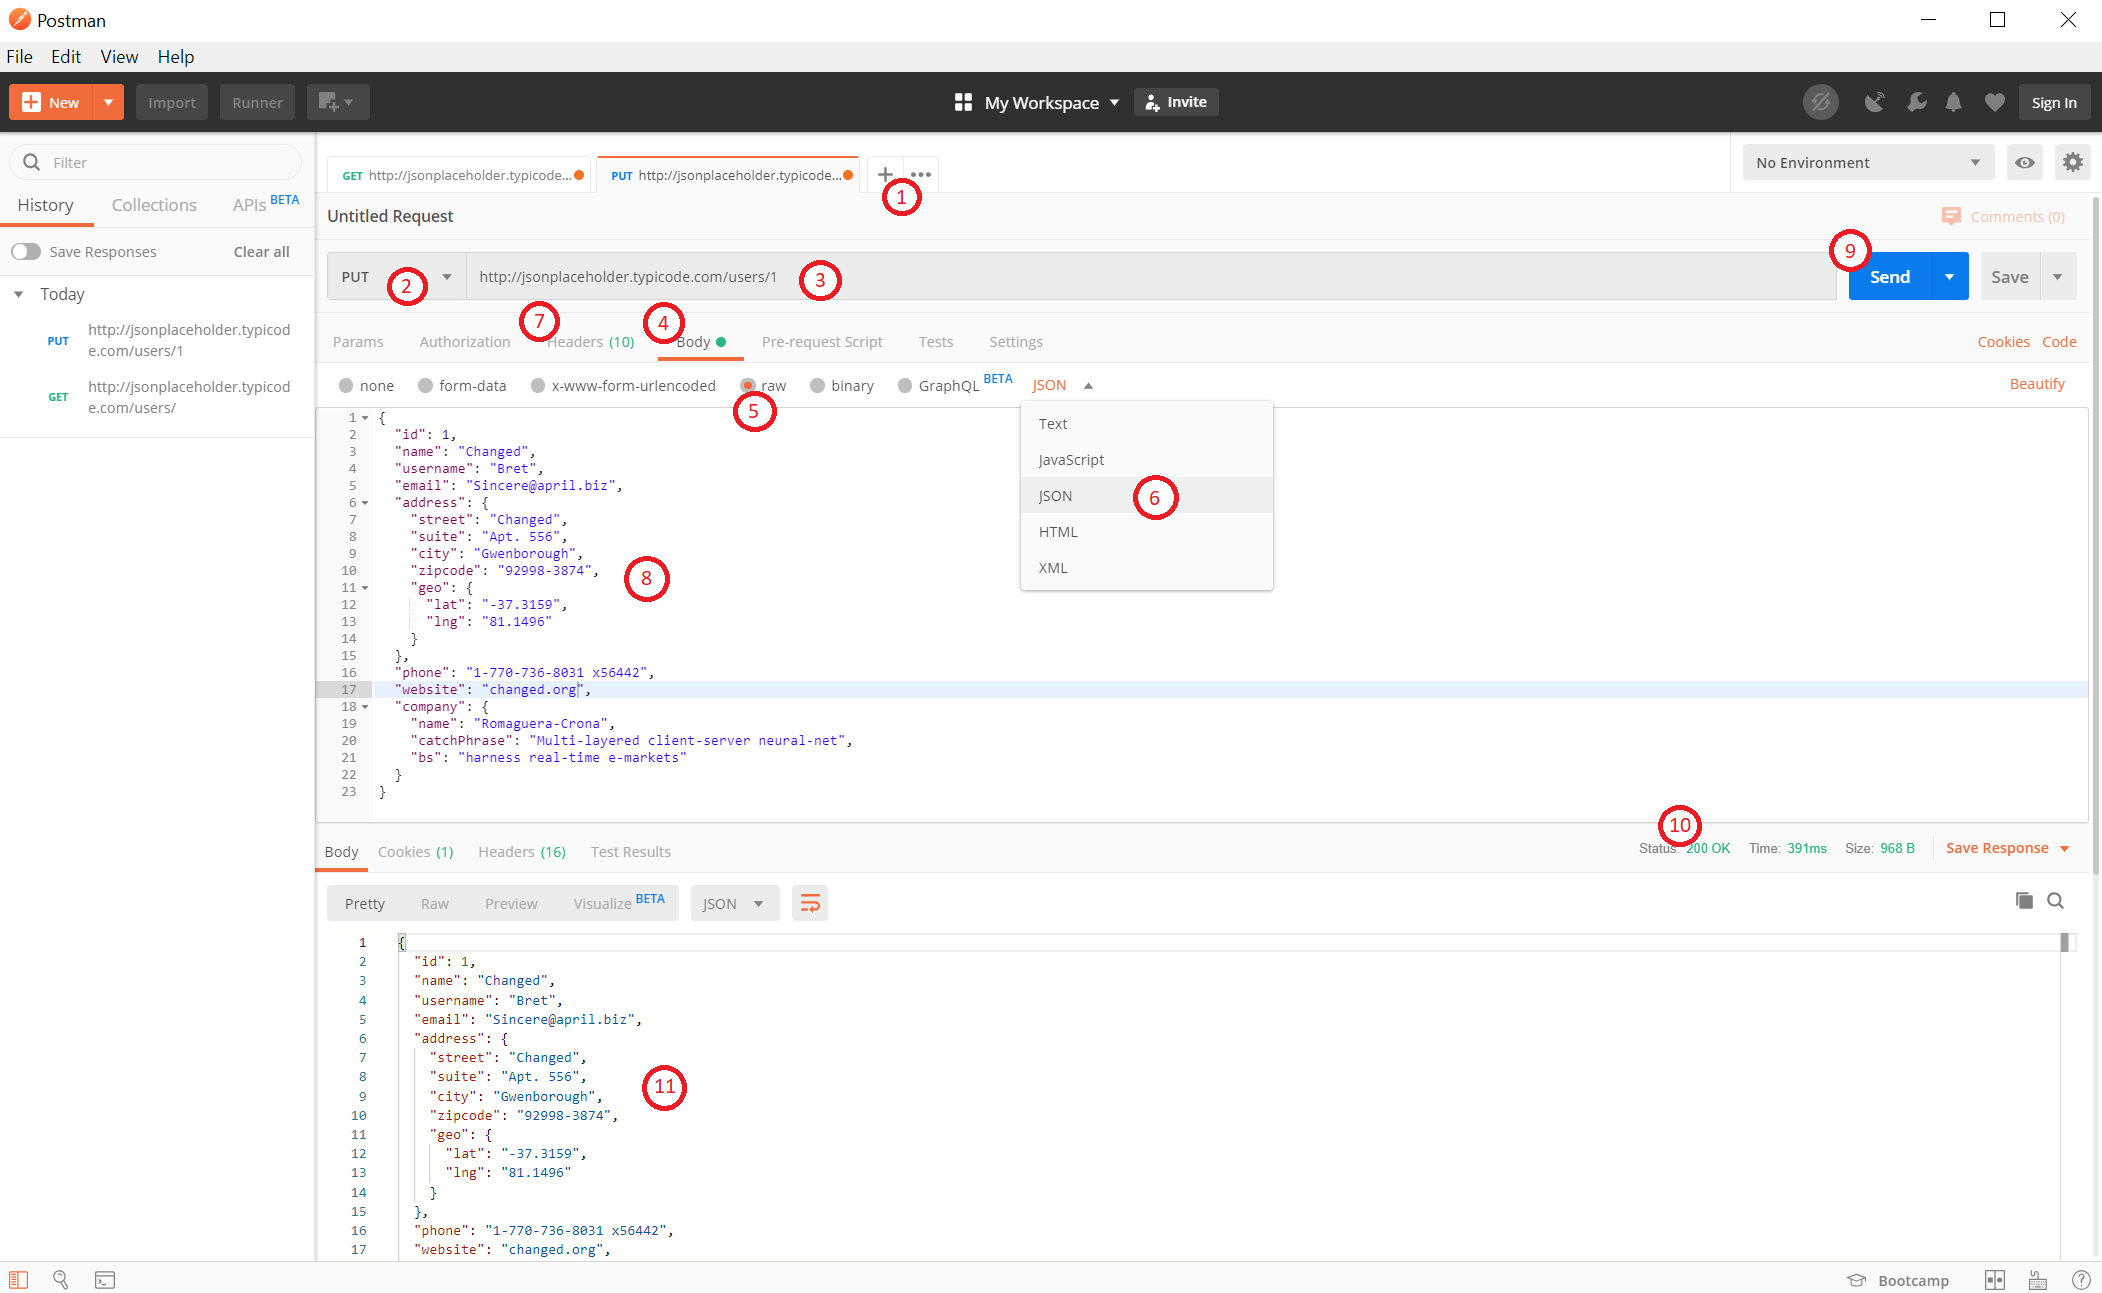
PUT requests differ from the GET requests as they are used to manipulate data. Now you have to include a body to the request. We can use the data from the previously sent GET request.
- Create a new tab for the request.
- Set the HTTP request method to PUT.
- Enter the request URL.
- The URL for the user with id=1 is
https://jsonplaceholder.typicode.com/usersfor this API.
- The URL for the user with id=1 is
- Switch to the body tab.
- Select raw.
- Select JSON as the body type.
- You can see that a header with the content-type is automatically added to the request.
- You can add headers by entering the key value for the header.
- You can disable headers by unchecking the checkbox before the header.

- Copy and paste the data of the first user from the previous GET request. Change some details like the name or the address.
- The body should have correct format. It is good to use GET requests to check the format. You can also use tools like this to validate or format JSON.
- Click Send
- Once again,
200 OKstatus code should be displayed. - The modified data is shown in the response body.

Postman has a lot more to offer besides sending basic HTTP requests. For example, you can also create different environments, automatic tests and pre-request scripts. Postman also supports Continuous Integration. For more detailed information take a look at getpostman.com.
Conclusion
Maintaining the fragile balance between making APIs user-friendly for developers, and protecting them from malicious actors is a difficult process. The tips listed above are just a starting point for the endless road towards a fully secure API. Not to wander from that path and to have a fair chance against all the tireless attackers out there, you need to keep yourself updated with the latest tools and techniques regarding API security.

